
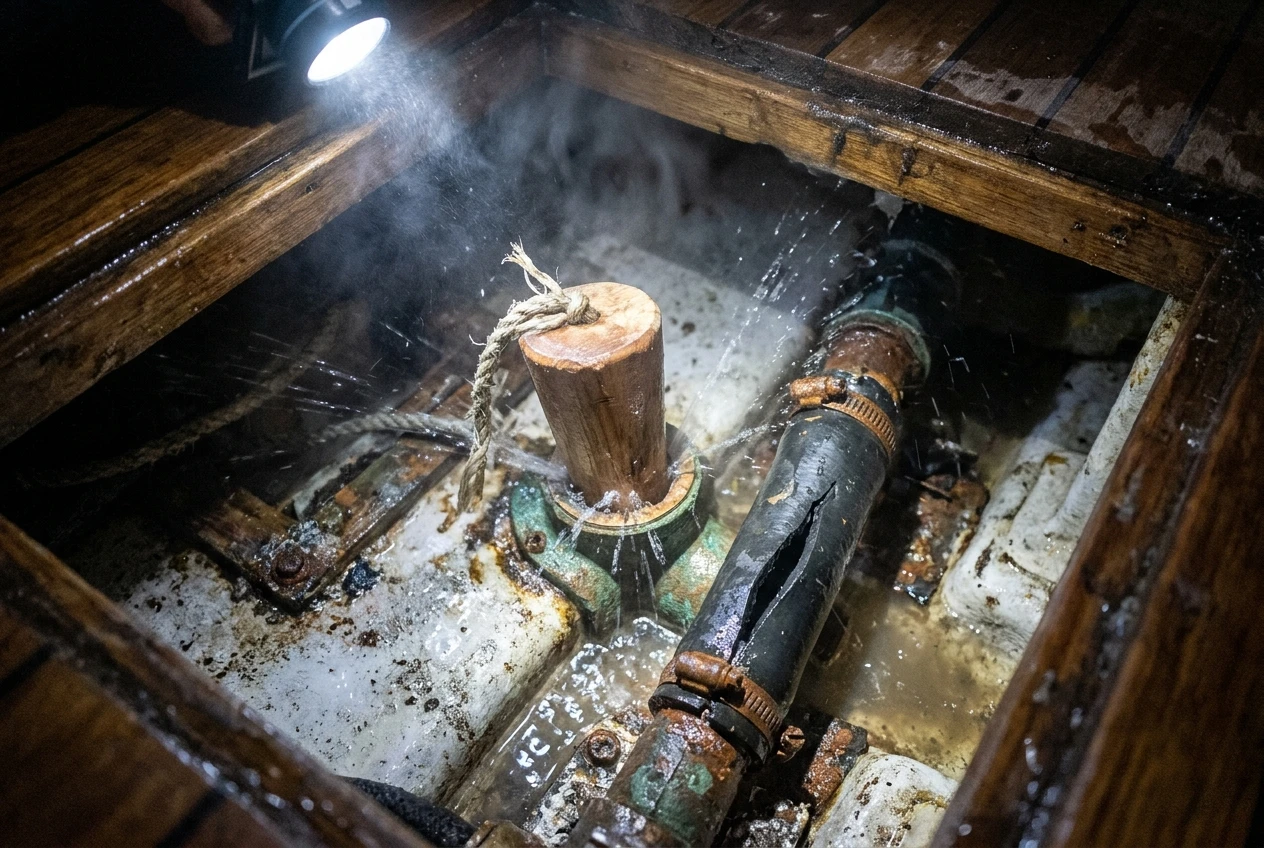
If you are asking what to do if your sailboat is taking on water, the answer is a sequence you run in order: find the source, slow the flow, then out-pump what is left. Every step depends on gear you can reach and a crew who already know their jobs. The first ten minutes decide whether this stays a repair or becomes an abandonment, so the plan has to exist before the bilge alarm sounds.
This article follows those ten minutes in order, then covers the kit, the stowage and the drills that make the sequence work.
Decide in the first 30 seconds: who does what when the bilge alarm goes off
A bilge alarm gives you a few seconds to assign jobs. Without a prior agreement, everyone goes below to look, and nobody drives the boat. The roles below work for a crew of three or more, and a couple can split them into two.
- Helm: One person stays on deck, steers, reduces sail, marks the position on the plotter, and handles the radio. This person also watches the sea state and decides which tack puts the damaged side up.
- Source finder: One person goes below with a headlamp, lifts floorboards and traces the water to its entry point.
- Pumps: One person starts the electric bilge pump on manual override and gets the manual pump handle in place.
Short-handed, the skipper takes the helm and radio, and the second crew member searches while the electric pump runs. Everyone puts on a life jacket before going below. A flooded cabin in a seaway is a poor place to discover you cannot swim out of the companionway tangled in loose gear.
In the first half minute, silence the alarm, note the time, and call out one word to tell everyone the plan has started. Pick the word in advance. The clock matters because a rising bilge level over time is your best measure of whether you are winning.
Finding the water: how to tell a failed hose from a holed hull
Taste the water first. Salt water means the sea is getting in. Fresh water means a tank, a pressure-water line, or a hot-water heater is leaking, and you can stop it by switching off the pressure pump and closing the tank outlet valve. Melted ice from an ice box can also fool a crew in a panic, so check that too.
If it is salt, work from the most likely sources to the least likely:
-
Every through-hull and its hose. Check the seacocks, hose connections, and clamps for the sink drains, heads, engine raw water intake, cockpit drains, depth sounder, log and speed transducers, and cockpit scuppers.
-
The shaft seal or stuffing box. Check whether the packing is dripping heavily or the hose clamps on a dripless seal have slipped.
-
The rudder post and steering gear.
-
The hull itself, especially around the keel joint, the bow, and anywhere the boat has struck something.
Water behaves differently depending on its source. A failed hose or fitting typically produces a steady jet or a flow that does not change with the boat’s motion. A holed hull often surges as the hull pitches, with ingress that varies with speed and sea state. Slowing the boat will reduce the flow through a hole near the bow or the waterline. It will do little for a fitting that is simply open to the sea.
Search by sound as well as sight. Running water makes a distinct noise even when the bilge is already full and dark. Clear lockers and lift sole boards one section at a time, and feel along hull and fittings with your hands if the water covers them. Start at the lowest point and work upward, because water collects where it is deepest and the leak is usually above that.
Slowing the flow: bungs, plugs, collision mats and what each one fits
Once you find the entry, your goal is to reduce the flow enough for the pumps to get ahead. Different openings need different tools.
Tapered softwood bungs are the first line for any failed through-hull or seacock. Drive the bung into the fitting or the open hose end with a mallet until it seats. You want bungs in a range of sizes, because a bung too small for the opening will not hold. Wrapping a bung in a rag or smearing it with grease can help it seal.
If a hose has failed but the seacock still closes, close the seacock. That is faster and more reliable than any plug. If the seacock is seized or has broken off, remove the hose and bung the fitting from inside.
Soft plugs and rags work for irregular openings, such as a split in a hose or a crack at a fitting. Pack the gap and hold it in place with a board and a shore, such as a boathook, a bunk board or a spinnaker pole wedged against the opposite hull or cabin structure.
Underwater-curing epoxy putty can seal small cracks and seeping joints. Check the label before you buy, because only some putties cure on a wet surface. A stick that cannot set in water is useless in this job.
A collision mat is a square of heavy canvas or sailcloth with lines on the corners. You lower it over the side and pull it across the hole from outside. Water pressure pushes it against the hull and helps hold it in place. It suits holes you cannot reach from inside or damage that is too large for a bung. Rig the lines so you can lead them back to winches or cleats and keep tension on the mat.
For a hole you can reach from inside, pad it with a cushion or folded cloth, lay a piece of plywood over it, and shore the board hard against the hole. This will not stop all the water, but it can cut the flow to a level the pumps can handle.
Fittings that fail most often: seacocks, hoses, shaft seals and keel bolts
Most flooding starts at a fitting, not a hole in the open hull. Knowing where to look first saves minutes.
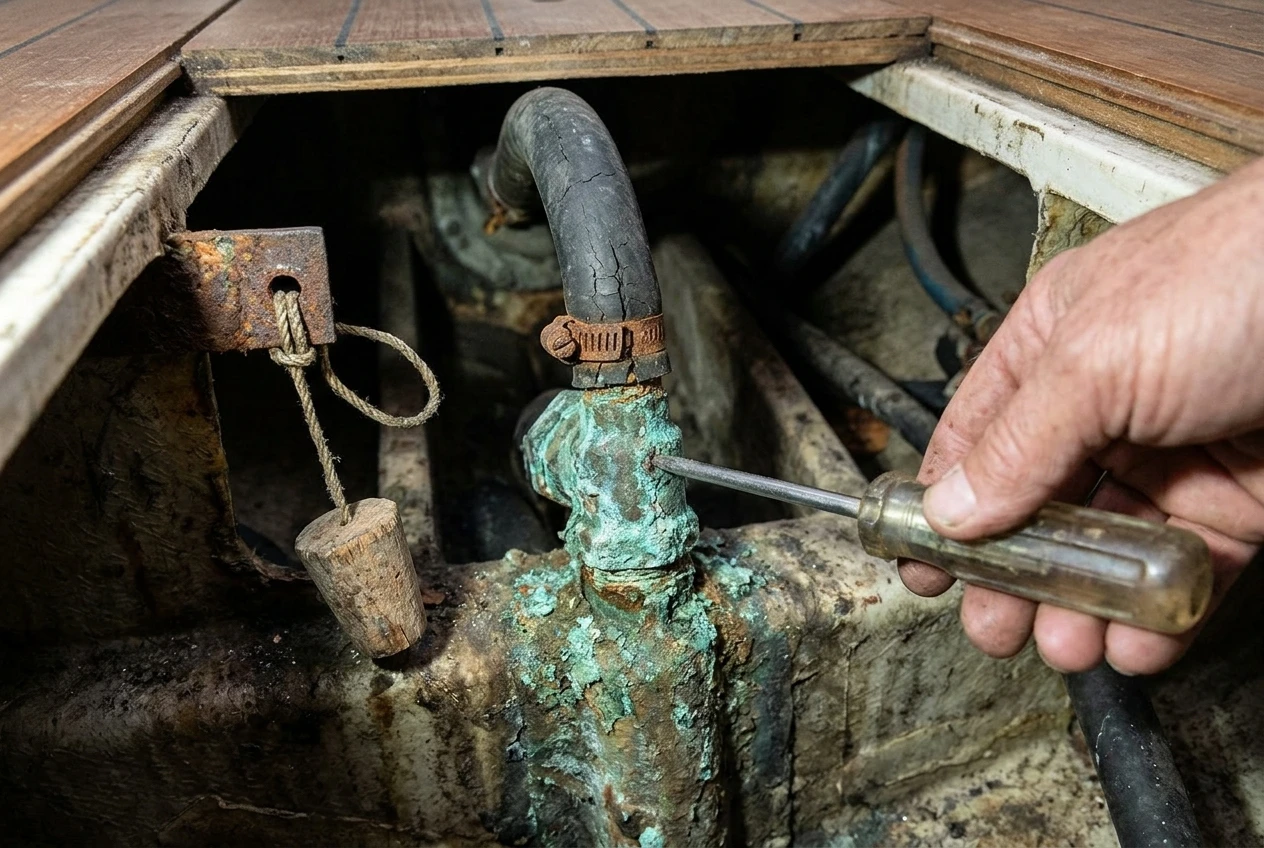
- Seacocks: Bronze seacocks last well when exercised. A seacock that has never been turned can seize open, which leaves you with no way to close it. Brass fittings can corrode from the inside while looking fine outside. Tap a suspect fitting with a screwdriver handle. Sound metal rings, and a corroded fitting sounds dull or flakes.
- Hoses and clamps: A hose below the waterline needs two stainless clamps at each fitting, and the hose itself should be rated for marine use. Old hose hardens and cracks near the clamp. Squeeze the hose: if it feels brittle or collapses, replace it.
- Shaft seals: A traditional stuffing box should drip slowly when the shaft turns and little or none when it is stopped. A rapid drip, or a spray from a dripless seal, means the packing or hose clamps need attention. If a seal fails fully, you may have to stop the engine and plug around the shaft.
- Keel bolts: Leaks at the keel joint often follow a grounding. Look for cracking around the joint, rust weeping at bolt heads, or a keel that moves when the boat is heeled. You cannot plug keel bolts from inside in any practical way, so treat a leak here as a pumping problem and a signal to reduce load on the keel by slowing down and easing the sails.
Also check cockpit drains and their hoses, transducer housings, and any removable fittings like a log wheel. A transducer pulled out for cleaning can be plugged with its own blank cap or a bung.
Out-pumping the water: bilge pump capacity, strainers and the manual backup
A bilge pump’s advertised rate comes from ideal conditions with no lift and a full battery. On a real boat, a long hose, a high discharge point, a low battery, and a partly clogged strainer all reduce the real output. Treat the rated number as a ceiling, not as what you will get.
The pump is only as good as its pickup. Debris, such as hair, labels, loose screws, and wood chips, clogs strainers quickly. Keep the strainer accessible, check it often, and fit a pump where you can clear it without removing half the cabin sole.
A sound pumping setup usually has several layers:
- A main electric pump low in the bilge with an automatic float switch and a manual switch at the helm.
- A second electric pump mounted higher, on a separate circuit and fuse, so a single wiring fault does not disable both. The power budget for your boat’s safety systems shows how to account for pump draw so your batteries can sustain them during a long flooding event.
- A manual diaphragm pump that you can operate from the cockpit with the handle stowed beside it. A manual pump has no battery to fail.
- Buckets, which are among the most dependable pumps on a boat. Carry at least two sturdy ones with lanyards, and keep them where you can reach them.
Some boats can also draw bilge water through the engine’s raw water intake using a dedicated valve. This can move a lot of water, but it takes preparation to set up, and the engine must keep running. Know whether your boat has this arrangement before you need it.
Watch the bilge level against the clock. If the water falls while the pumps run, you are winning. If it holds steady, you are matching the flow and need to find a way to reduce it. If it rises, start thinking about when you call for help.
Heeling the boat to lift a breach clear of the waterline
When the hole is on one side and above the keel, heeling the boat to the opposite side can raise the damage above the waterline. Tack or gybe so the damaged side is windward, then add heel by shifting weight to the leeward side, trimming sails, or moving heavy stores.
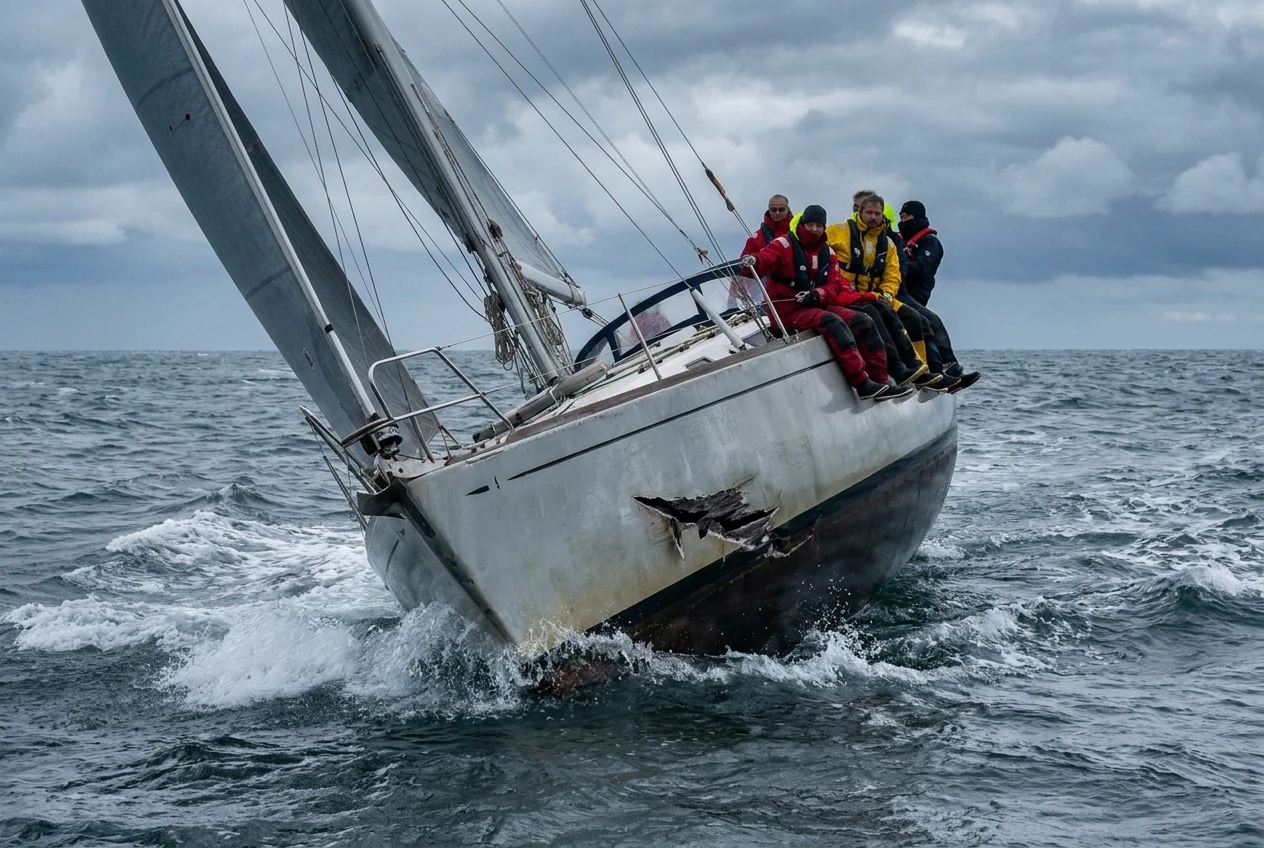
Heaving to on the right tack can hold the boat in position and reduce the load on the damage. Slowing down also helps, since a damaged bow or forward hull takes less water at low speed.
Heel has costs. Water in the bilge runs to the low side, so your pump pickups must be where the water goes. A heeled boat can also take water through vents, open ports, or lockers that were above water when upright. Close everything you can before you heel.
This technique suits breaches above the keel line and low on the topsides. For holes near the keel or on the bottom of the hull, you cannot lift them clear, so plug and pump instead.
Building a damage control kit and stowing it where you can reach it flooded
A damage control kit is useful only if you can get to it while the boat is filling. A kit in the lazarette, under a berth or in a locker below the waterline can be underwater or buried under floating gear when you need it.
A basic kit includes:
- Tapered softwood bungs in graded sizes, plus extras for the biggest fittings
- A mallet or hammer
- Underwater-curing epoxy putty
- Self-amalgamating tape and spare hose with stainless clamps
- Screwdrivers, pliers and a knife
- Plywood offcuts, a few wooden wedges and a section of rubber or lead sheet
- A collision mat or heavy canvas with lines on the corners
- Rags and towels
- A waterproof headlamp and spare batteries
- Two buckets with lanyards
Keep the main kit in a bag or box near the companionway, above the waterline, where a person can grab it without going into the water. Keep a second small set near the bow if your boat is long enough that crossing the cabin would be difficult. Label the container clearly and make sure every crew member knows where it is.
In addition, tie a tapered bung to every through-hull with a short lanyard so it is right there when the fitting fails. A bung in a bag across the boat does nothing for you when the seacock is spraying in front of you.
The essential sailing safety equipment checklist covers the rest of what belongs aboard before you leave the dock, and the damage control kit sits alongside it.
When to stop fighting: the point at which you call for help and prepare to abandon
Call for help earlier than feels necessary. A Pan-Pan or Mayday that you cancel costs nothing, and one made too late may never be heard. Make the call when the water is rising despite full pumping, when you cannot find the source, or when the damage is beyond the tools in your kit. The DSC distress alert guide explains who receives the alert and what follows, so you can use the radio correctly under pressure.
Once you have called, assign one person to prepare for abandonment while the others keep fighting. That person should:
- Activate the EPIRB
- Bring the ditch bag and the raft to the cockpit or the deck
- Gather water, flares, a handheld VHF, and warm clothing
The ditch bag checklist lists what belongs in the bag so that this task takes seconds.
Launch the raft only when the boat cannot be saved, and keep it tied to the boat until you board. Step up into the raft rather than down, because a boat that is still afloat is a better shelter than a raft. Keep pumping and plugging for as long as you can do so safely.
Drills that make it work: a flooding exercise for your crew
A plan you have never practiced will fall apart under stress. Run a flooding drill at least once a season and every time a new person joins the crew. Do it at anchor or tied up in calm water, and never cut a hose or open a seacock to create real flooding.
A simple drill runs like this:
- The skipper calls out the agreed word and states a scenario, such as “the engine raw water hose has failed.”
- Crew take their assigned jobs and say aloud what they are doing.
- The source finder locates the through-hull in question and fetches the correct bung from beside the fitting.
- The pump operator starts the electric pump, then switches to the manual pump and works it for a full minute.
- The helm marks a position and practices the radio call.
- Time the whole sequence and write down what slowed you down.
Repeat the drill with a different through-hull each time. Also try it with the cabin lights off and the headlamps on, since flooding often happens in the dark. A final debrief should cover what was hard to reach, what was missing, and which roles need changing.
The aim is that everyone on board can find every seacock and every bung without thinking. That comes only from repetition.
Walk your boat with this list this week: count every through-hull, check that a tapered bung is tied beside each one, and note which are missing so you can fix them before your next passage.
This article was created with AI assistance and reviewed by a human editor.
Disclosure: This post contains Amazon affiliate links. If you buy through them, we may earn a small commission at no extra cost to you.
About The Author


